Contact Us
Salt Lake City Office
1152 W 2400 S,
West Valley City, UT 84119
St. George Office
368 Commerce St Unit 30-31,
Hurricane, UT 84737
Ogden Office
1805 2900 S Unit #1,
Ogden, UT 84401
Phone: (801) 355-4433
License: #12559394-5501
Replacing and installing a new toilet isn’t rocket science, but it does require patience, the right tools, and a bit of plumbing know-how. Follow this step-by-step guide to toilet replacement, and don’t hesitate to contact us if you need toilet plumbing service!
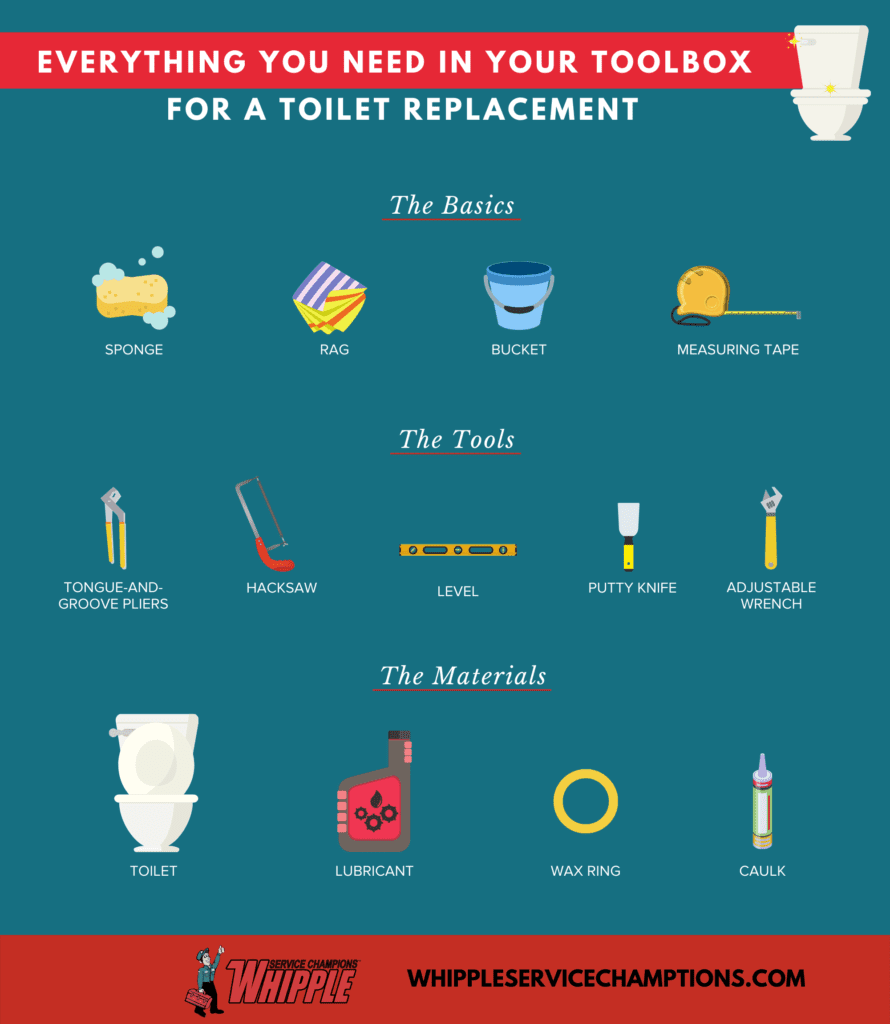
Nothing is more frustrating than realizing your new toilet doesn’t fit halfway through your DIY installation. Ugh! Avoid this hassle altogether by measuring your current toilet before you purchase a new one. Measure the distance from the toilet’s bolts to the wall to get an idea of the waste pipe size. Also, just to be safe, try to find a new toilet that matches your current one as much as possible.
First things first, you have to turn off the water supply by turning the stop valve on the wall, so you don’t find yourself dealing with an accidental plumbing disaster. Once the water is off, flush the toilet to drain the tank and the bowl. With the water supply connection severed, they will not refill. However, you may find some water lingering around at the bottom. Use the sponge and bucket to remove any remaining water.
Then, disconnect the toilet tank from the water supply line using the tongue-and-groove pliers. Place the water supply line in the bucket in case there’s any water inside that needs to drain out.
Remove the plastic caps (also known as toilet bolt caps) that cover the bolts. This should be pretty easy to pop off, but you can also use a screwdriver if necessary. Use the adjustable wrench to loosen the nuts, washers, and bolts. If these pieces are being stubborn and not moving, use the lubricant to loosen them. Let the oil sit for a little bit before trying again. If the nuts and bolts still don’t nudge, use the hacksaw to cut them at the base.
Before you pull the toilet, check to see if the base is caulked. If it is caulked, use a utility knife to break the connection. Then, gently tilt the bowl from side to side to detach it.
Warning: Toilets can be heavy, so be careful when you remove this. Bring a buddy to help, if possible. You can also try separating the tank from the bowl.
Here’s the most disgusting part of the whole removal/installation process: removing the wax seal. The wax seal is important in keeping the wastewater contained on its journey to the sewer pipes, and it’s also the key to keeping your bathroom smelling fresh and clean. Therefore, when you remove the toilet and open up access to the sewer line, all the lovely smells will immediately start coming out. Grab an old rag, wrap it in plastic, and stuff it in the opening (but not too far down) to block the sewer gases.
Use a putty knife to remove the wax seal. Dispose of the wax seal immediately, so it doesn’t stick to your bathroom floor. Once the wax seal is completely removed, inspect the flange for damage. If you notice it’s worn down or broken, you’ll need to replace this part as well.
Remove the old rag blocking the sewer line opening and place the new wax ring inside the flange. Be careful about not damaging the wax ring and placing it down in the right spot because once installed, it cannot be reused. Then, install the flange bolts, ensuring the threaded ends are pointing up.
Carefully and preferably with the help of a buddy, lower the new toilet over the flange so that the bolts enter the holes on the stool. This may take some trial and error. Once the toilet is in place, press down to set the seal.
Make sure the toilet is level, but don’t try to move it if it’s not! This will break the wax seal, and you’ll have to start all over. Place some pennies underneath the stool to level it instead.
You’re almost done! Now, you have to thread the nuts and washers on the toilet floor bolts — alternate tightening between each side until they’re both secure. Make sure you don’t overtighten, which can cause the base to crack.
Use the hacksaw to shorten the bolts if they are sticking out above the nuts, then cap them.
Finally, caulk the area where the tile meets the toilet bowl to make sure everything is securely in its place and to avoid ruining your bathroom floor in the case of a leak.
Attach the water supply line to the toilet tank and turn on the water. Let the toilet fill up, then perform a test flush to make sure everything is working properly.
Applaud yourself for doing a great job and enjoy your new toilet!
If you get stuck on any step or you don’t feel comfortable enough to replace your own toilet, please contact a professional plumber instead! Whipple offers emergency plumbing services near Salt Lake City and the surrounding areas, so we’re always at your disposal, and we have years of experience performing toilet replacements and installations.
Contact us today to learn more!
Contact Us
Salt Lake City Office
1152 W 2400 S,
West Valley City, UT 84119
St. George Office
368 Commerce St Unit 30-31,
Hurricane, UT 84737
Ogden Office
1805 2900 S Unit #1,
Ogden, UT 84401
Phone: (801) 355-4433
License: #12559394-5501
Recent Posts
Accreditations


Whipple Service Champions
Proud Partner Of